Introduction
In this post, I’ll guide you through integrating the Amazon Incentive API with Pega using AWS Signature Version 4 authentication, implemented through a custom Java function. This method isn't limited to the Amazon Incentive API—it works seamlessly with other AWS services like S3 and Lambda.
By the end of this guide, you’ll understand how to implement AWS signature authentication in Pega, enabling smooth connectivity with any AWS service.
Why This Matters
Integrating Pega with external APIs is a frequent requirement in many projects. A common challenge arises when dealing with AWS Signature Version 4 authentication, which Pega doesn’t natively support. This limitation can complicate integrations with services like the Amazon Incentive API. However, by leveraging Java's flexibility, we can overcome this hurdle with ease.
Overview of the Amazon Incentive API
The Amazon Incentive API provides access to Amazon’s digital incentives, allowing applications to order and deliver Amazon gift cards. Businesses can use this API for reward distribution, customer engagement, and employee incentives.
Create an Amazon Partner ID and Secret Key
- Sign up for an Amazon Partner Account:
- Go to the Amazon Associates Central or the AWS Partner Network (APN) if required for your integration.
- Sign in with your Amazon account or create a new one.
- Generate API Credentials:
- Navigate to the Security Credentials page within your account settings.
- Under the Access Keys section, click on Create New Access Key. This will generate
- Access Key ID (public identifier).
- Secret Access Key (used to sign API requests).
- Save the Secret Access Key securely. You won’t be able to view it again after closing this window.
Here are some common endpoints and functionality offered by the Amazon Incentive API:
- OrderGiftCard: To order a gift card.
- CancelGiftCard: To cancel an existing gift card.
- GetGiftCardBalance: To check the balance on a gift card.
Each API request requires specific headers and an AWS Signature for authentication, ensuring secure communication with Amazon's servers.
Required Headers and Payload
For Amazon Incentive API calls, here are the headers that must be included in each request:
- Authorization: This header contains the AWS Signature and other required values, such as the access key and signed headers.
- x-amz-date: The date in ISO 8601 format (e.g., 20241023T120000Z) used for timestamping the request.
- x-amz-target: Specifies the target API operation, such as AmazonIncentivesService.OrderGiftCard.
- Content-Type: Usually set to application/json.
Example Payload for Ordering a Gift Card
Refer the link below to get the sample code.
https://developer.amazon.com/docs/incentives-api/digital-gift-cards.html#requests
To test the Amazon incentive API with postman after creating the Amazon incentive account. Refer the below video.
https://youtu.be/so51xP-oHD8?si=2nJcy_xlE3BhJCdA
Why AWS Signature Version 4?
AWS services use the AWS Signature Version 4 to authenticate requests. To ensure secure communication between your Pega application and AWS services, you must sign each request using your AWS credentials (Access Key, Secret Key).
Pega doesn’t natively support this form of authentication out of the box. To handle this, we need to build a custom Java function to generate the AWS signature and attach it to the HTTP request headers dynamically during each API call.
Step-by-Step Guide to Integrating Amazon Incentive API with Pega
Step 1: Setting Up REST Integration in Pega
Now, let’s configure the REST Connector to use our custom authentication mechanism.
- Create a REST Connector:
- Use Pega’s wizard to create a REST Connector for the Amazon Incentive API.
- In the authentication step, leave it as Basic since the AWS signature will be manually generated through our Java code.
- Based on the above headers, enter the headers in the wizard page and create the rest connector.
Step 2: Create a Custom Java Function for Signature Generation
First, we need to generate a signature that complies with AWS Signature Version 4. For this, we’ll write a Java function that takes the necessary parameters (like a secret key, access key, region, service name, Request ID, and Amount) and calculates the signature.
In our Java code, we have two input parameters: Request ID and Amount. All the other parameters are hard coded in the Java function itself. If we are changing any parameters often, it should be better to put them as input parameters and create the Java function.
This Java code will return the Authorization header.
Example:
Authorization:
AWS4-HMAC-SHA256 Credential=AKIAJBYCL67O6NJUNYBQ/20130910/us-east-1/AGCODService/aws4_request,
SignedHeaders=accept;content-type;host;x-amz-date;x-amz-target,
Signature=66872de215ae457cd978a49be377caf7cd3b5ab2914785339c2b8242e3631a71
Why is this function important?
AWS requires each request to be signed, which means for every API call, the signature is generated dynamically based on the current request data (HTTP method, headers, payload, etc.). Without this function, AWS will reject the request.
Step 3: Calling the Java Function in Request Data Transform of Rest integration.
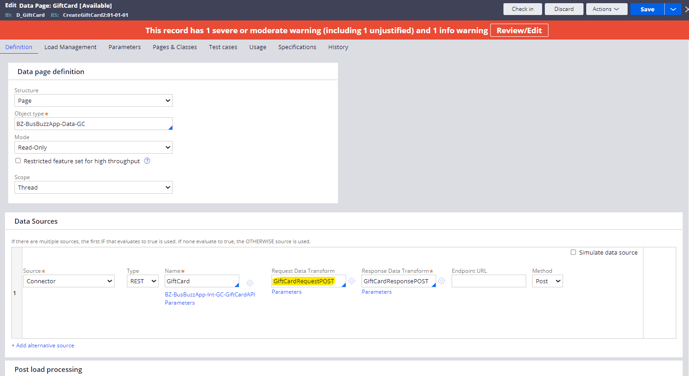
Call the java function the Request data transform of your Rest integration Data page. Pass the parameters, i.e.) Request ID and Amount. The Function will return the AWS authorization header in a parameter.

Map that parameter to a local parameter and call that property in your connect rest rule in the methods tab under post method.
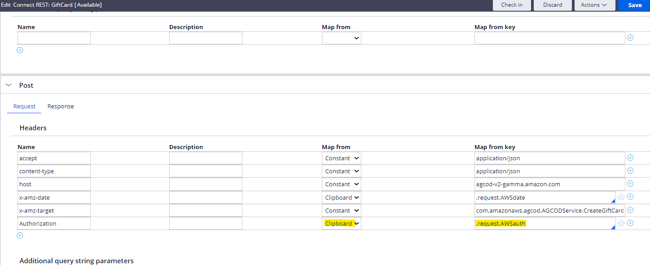
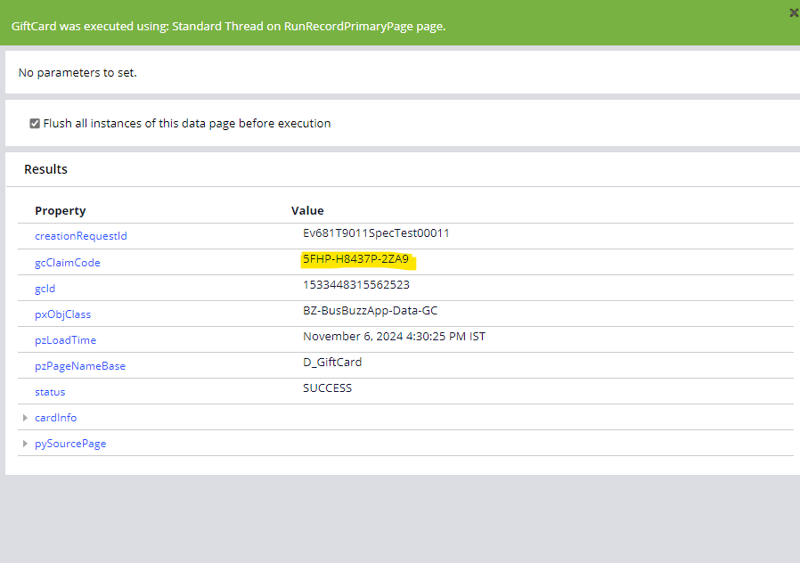
Now, the signature sent to AWS dynamically equals the actual signature calculated by the AWS. So the request will be accepted by the AWS and you will receive the Amazon coupon code.
Example result:
STEP 4: Creating the custom payload
This is the sample payload for Amazon incentive API
<CreateGiftCardRequest>
<creationRequestId>AwssbTSpecTest001</creationRequestId>
<partnerId>Awssb</partnerId>
<value>
<currencyCode>EUR</currencyCode>
<amount>1.00</amount>
</value>
</CreateGiftCardRequest>
While creating the rest connector using the Wizard we can give this as sample payload, based on this pega will create the payload request for us.
Important Note:
However, Pega maps the outbound request based on alphabet order. It will map like this
</value>
<amount>1.00</amount>
<currencyCode>EUR</currencyCode>
</value>
But AWS expects the payload to be in the reverse. So when we try to inbound, it'll cause a signature mismatch error from the AWS server. To rectify it, we must create our own request using a data transform and map the request to the appropriate place.
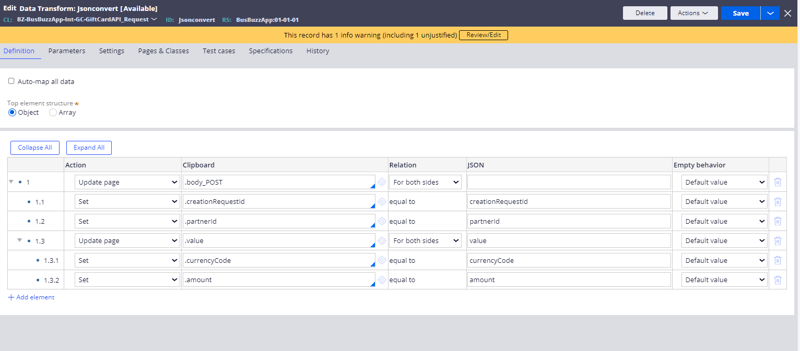
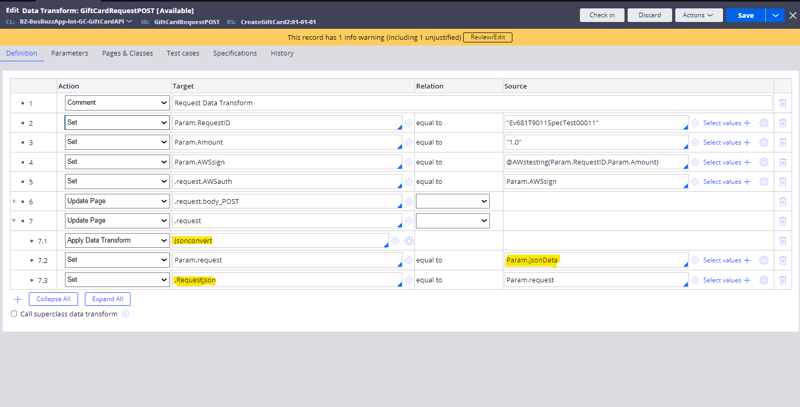
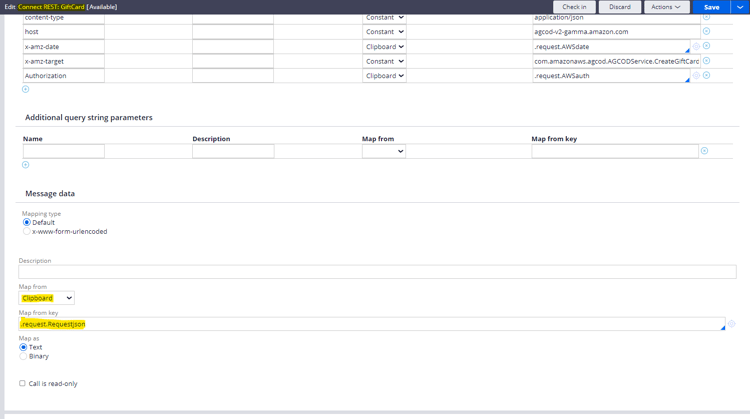
Now, we'll send the payload as per the Amazon incentive API’s requirement and receive the results from the AWS server.
Step 5: Testing the Integration
Once all configurations are in place, you can run the integration to ensure it works smoothly. Use Pega’s Tracer to verify the request and response, ensuring the correct headers are sent with each API call.
Key Challenges & Solutions
Challenge 1: Handling Signature Expiration
AWS signatures have a time limit (5 minutes). If your Pega application takes longer to generate and send a request, you may encounter signature expiration issues.
Solution: Ensure that the x-amz-date header is dynamically generated right before making the API call, and make sure to keep the request-processing time within AWS's allowable limit.
Challenge 2: Mapping Headers in Pega
Pega’s REST Connectors have predefined fields for headers, and sometimes it can be tricky to map custom headers.
Solution: By using a Java step in the activity, we can manually inject custom headers like Authorization, ensuring the API request is correctly signed and authenticated.
Challenge 3: Payload Ordering for Signature Accuracy
Pega’s REST Connectors have predefined fields for headers, and sometimes it can be tricky to map custom headers.
Solution: To resolve this, use a Data Transform to structure the request payload correctly.
Benefits of This Approach
Reusable Functionality: The custom Java function to generate AWS signatures can be reused for other AWS services, making it easier to integrate Pega with multiple AWS APIs.
Customizable: This solution is highly customizable. You can modify the Java function to cater to different AWS services, adjust the logic for signing the request, or change how headers are passed.
Extendable: This approach can be extended to support more complex scenarios like multi-region API calls, larger payloads, or even streaming requests with S3.
Final Thoughts
Integrating Pega with AWS services using AWS Signature Version 4 authentication can initially seem daunting, but with the right approach, it’s entirely manageable. By leveraging a custom Java function in Pega, this integration becomes both flexible and efficient. While this method is tailored for the Amazon Incentive API, it extends seamlessly to other AWS services like S3 and Lambda.
Pega’s power as a platform for building business applications grows exponentially with secure AWS integration, unlocking a wide range of possibilities. This guide aims to provide you with a clear roadmap for tackling your next AWS integration with confidence.